Lesson 2 - Setting Up Phone Service

Now that you have entered the customer information and verified his or her credit, set up phone service. Each service provider has different sets of services -- called bundles-- and add-on features. Your service provider's sales literature can guide you here.

In addition, your service provider might have Momentum invoice its customers. To add this feature, select Billing as the category.

To add products:

  1. On the Add Product page, click Category name and then select Bundles.

    The page updates and the services your service provider offers are available in the Service name list.

  2. Click Service name and select the correct service. (In this example, the Premium Residential LD Bundle is selected.)

  3. Click Next to go to the Edit Product page and set up the telephone service.

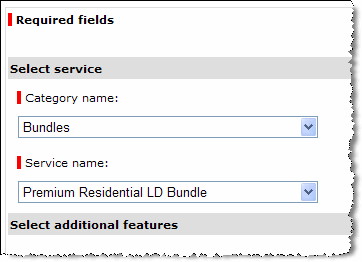
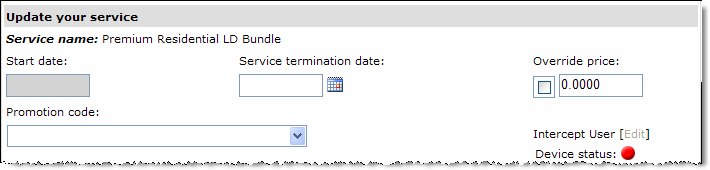
    Notice that the Service name is the bundle you just selected.

  4. In the Update your service section, if the Start date field is available (not gray), you must enter a start date for the service. This applies to services that do not require a device -- for example, a billing service.

    For services that require a device, you do not enter a start date (the Start Date field is gray). Phone service starts when the customer connects his or her VoIP device. RPM automatically enters this "connect" date as the start date.

    You should also enter the Service termination date, Line description, and Promotion code, if applicable. (These are not required.)
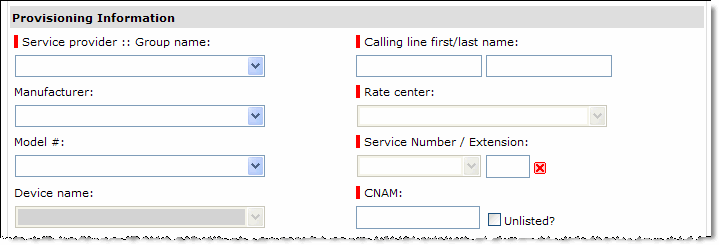
  5. In the Provisioning Information section note the indicators and select or enter:

Now, select the VoIP phone from the available list:

  1. The Manufacturer and Model # lists include all phones supported by your service provider.
  2. Select a specific VoIP phone from the Device name list.

    The device name is the MAC address, followed by an underscore and the model number. For example: the device name 1004F203EF7D_IP999 indicates a model IP999 with the MAC address, 1004F203EF7D. Make sure the MAC address in the device name matches the MAC address on the phone you are assigning.

    IMPORTANT: If no devices are listed, contact your system administrator. He or she must add more devices in RPM.

  3. Click Submit.

The Directory Assistance/Directory Listing page is displayed. Continue with the next lesson to enter directory information for the new account.

Lesson 1 - Adding a Customer Lesson 3 - Entering DA/DL Information